inchie mingles

Mingles are sort of like swaps, except that one person gets all your inchies, instead of one of each person's. I don't know why, but my mingles are due at the end of the month, so I thought I'd better get on with it.

The first set was for the theme of red, gold, and black:


I did use the right colors, and I put plenty of related elements on them, but they still don't look very cohesive. I think I started giving up on making them nice when I realized that I didn't even know if my characters were right side up.


The theme for this mingle is the Roaring Twenties. These inchies are hugely derivative of a certain Gingersnapper's recent work - I definitely CASE'd these inchies. They don't roar, but I like the ladies in their hats, and the little black rhinestones (that's what they are, not that you can tell it from the scan) remind me of the those fake beauty spots.

Juliet Arrighi

Snow bunny

This ATC just hit me all at once - I was thinking about the technique (Mono Die from Technique Junkies), looking at the stamp, and wishing winter was over (it's supposed to snow more tomorrow), and the whole thing just appeared in my mind.


It's a very plain, simple card, but it is exactly how it looked in my mind.

Juliet Arrighi

Presents for me!

I received some lovely presents in the mail recently. First, there is Shelly, who had an interesting interpretation of my swap instruction to "please include stamps for return postage". The stamps she included were rubber and polymer. I'm not complaining, I like those even better than the ones at the post office.

Second, my mother recalled that I go through a lot of purple cardstock making cards for Red Hatters, so she sent me a couple of packs of purple Bazzill cardstock, the dotted swiss and the Bazzill Bling, which has a metallic sheen in addition to the linen texture.

So, guess what I did today?


The flowers were ripped from small silk foliage, and the brads are CTMH. The patterned paper I picked up today at the Dollar Tree - 50 sheets of 12x12 paper for a buck!

The images were colored using the Penciled Twinks technique, and the sketch for the top card is from Sunflowers and Dragonflies.

Juliet Arrighi

Spring is sure to follow

Slowly the snow is melting, but I'm sooooo ready for spring! I think others are too, because a lot fo the challenge blogs have asked for spring cards this week. I found this little quote at the Quote Garden, one of my favorite places to go for a sentiment.


The background is the color collage technique, but the main technique featured here is the Faux Vellum technique; both techniques are from the Technique Junkie newsletter. My torn and distressed edges meet the Saturday Spotlight and Sherrod Studio challenges, my spring theme fits the Stamp Something challenge, and the dragonfly fits the Belli Challenge. If you would like this ATC or one very similar, just play in the TJ ATC swap.

Juliet Arrighi

Tim Holtz ATC

The challenge at Fun with ATCs is to make an ATC using Tim Holtz supplies. How easy is that? I have distress inks, I have his stamps.


I feel almost like I've cheated - his sets are so complete, I didn't need anything else. A little stamping, a little embossing, a little burnishing, a couple of doodads glued on - It looks okay, but it also looks like every else's. That's the Tim Holtz way.

Juliet Arrighi

Gum wrapper chain

Jen Lowe was commenting the other day that she bought a kit at Michaels to make gum wrapper chains. Pressed for a price, she admitted that the kit cost $6.95! that seems like a lot of money for little rectangles of paper, especially when she is a papercrafter, and has tons of paper, just like I do.

I had some scraps of valentine paper laying out on my desk, so I cut some up (the dimensions, if you are interested, are 1 inch by 2.75 inches), and played with it.


You can get 52 little wrapper sized bits of paper from a 12x12 sheet, or 32 from an 8.5x11 sheet. Thin paper is great for this, so if you have some cheaper papers, or even leftover giftwrap (wouldn't this be fun at a birthday party sleepover, to cut up the gift wrap and make chains?), go for it. My circle took 38 "wrappers", and is about 3 inches in diameter. I like this - it will be a cute frame for a round image on a card, I think. It works up really quickly, too!

Juliet Arrighi

Art journal, continued

Teesha Moore specific instructions after completing the main collage work are to pack up all your pens and markers and go to a coffee house to do your pen work. I didn't exactly go to a coffee house, but I did visit a friends house to drink coffee, and she cross-stitched while I doodled away.

This journal is not going to be finished any time soon - I spent about four hours on it today, and although I was seriously working the whole time, I felt like O got very little done. Teesha's method is to work a little on each page, and then jump around to another page. It does help, because your feelings about a page change when you move away from it for a while. Here are a couple of pages, neither of which is near completion. The first shows a little pen work - I was really struggling to connect the cat to the ...um...person:


I don't have a cat on every page, but I do seem to have a lot of animals in this book. When I was doodling on this page, this little rhyme came into my head, so I wrote it down before it could escape:


I like how this is evolving. It started off being very random, but it feels like there is a theme emerging.

Juliet Arrighi

Teapot Cheer

Remember when we used to make cards that had a pocket for a teabag in them? Now we don't bother with tea, we just put something else in the teapot. For example, I have this teapot full of flowers from Designed2Delight With the cherries on the front, I couldn't resist embossing it in white on this cherry red paper from Valerie's Sherbert collection.


All the papers and embellsihments are from the Sherbet collection, you can get it from The Sum of all Crafts. The layout sketch is from Card Patterns.

Juliet Arrighi

Wider columns

If you are on my blog site, and not just reading my blog through email or an RSS feed reader, you may notice that my main text column is a little wider. that's because I changed the settings in HTML, and you can too.

Go to Customize, then Layout, then click Edit HTML. What you see in the HTML box is scary-looking, even if you know how to write HTML code. Don't worry, we aren't making drastic changes, just a little tweak.


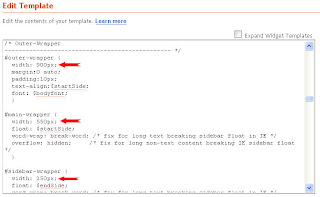
This is a screenshot of the place where we are going to make changes(click for a larger view). You want to scroll down to where it says "Outer-wrapper". You will see under this three different places where it says width - your view should show smaller numbers than mine (because I changed mine!). That is all you are going to change - change your numbers for my numbers.

Outer wrapper = 900
Main wrapper = 550
Sidebar wrapper = 250


This works regardless of which side your sidebar is on. Of course, you can use different widths, but the outer wrapper width needs to be longer than the main and sidebar widths put together (the extra amount is the space between).

Make sure you preview it before you save it, so it looks the way you want. if you have a custom header, you may want to change the header width, too (where it says header-wrapper, of course!).

If you try this, let me know how it works out for you, and if you need any help, you know where to find me.

Juliet Arrighi

Cutie tag

Cora is offering this freebie for Valentine's Day, so I made a little tag with it.


It is loosely inspired by this Wendy Vecchi tag. It also fits the ribbon Challenge at The Pink Elephant.

Juliet Arrighi

Art journal

I was discussing tutorials with my friend Cat - we were getting tired of doing Michelle Zindorf tutorials. I was already tired of Tim Holtz tutorials by the end of the twelve tags of Christmas. Who else has a style worth trying to copy (and is willing to teach it for free)? Wendy Vecchi? Ellen Hutson? Teesha Moore - yeah, I think I could learn a lot from Teesha Moore. She has a whole series of Youtube tutorials on how to do the things she does.

So, if you are wondering what I've been up to the past couple of days, I've been building an art journal. Teesha explains it very clearly, from cutting the paper and stitching together the signature, to applying paint to the paper, to ...everything. Friday I painted, yesterday, I applied borders, today I've been creating collage figures.

Here is a painted page with a border:


Here, I have the collage part mostly done:


I still have a few more pages to collage before I can start on the pencil and pen work. It's the pencil and pen work that really makes the journal. I know what I have right now is pretty weird, but it will get better/weirder before I'm done. I will let you know how I am progressing.

Juliet Arrighi

Embrace Rock and Roll!

I started off doing the tutorial for the Embrace Life card by Michelle Zindorf, but I decided as soon as I started looking through my flowers that I didn't really want to do flowers. I wanted to make a card that rocks, so I used the fabulous Rock and Roll stamp set that I won from Sherrod Studio (thanks, Kim!). Even if I hadn't won it, once she marked it 40% off (yes, it's on sale right now!) I would have had to buy it. Much better than flowers, I think!


After I finished my Rock and Roll medallion, I decided that what I really wanted to make was a spring card. The photo shows the card standing up, but it folds flat into an envelope. Cool, huh!

I colored the image with a gold metallic pen and Glaze Gellies, then burnished on Tim Holtz Distress inks for the background color. I finished it up with a little bit of white Milky Gel.

Juliet Arrighi

vases - 2

I thought these would be an easy tutorial, but this was surprisingly difficult. The hardest part, and one of the aspects that made it interesting, was that Michelle Zindorf brayers on patterned paper instead of the usual Whisper white. I didn't have the pattern she did, but I didn't realize that would be a problem. The first try I threw away. How bad do you think it was if these are the ones I kept? I guess it's a good thing these are ATCs; it's hard to throw away bigger art.


Not only was the process of brayering ink on patterned paper a sticky point, there were other things I didn't like about the tutorial. Why was the bright part of the vase on the same side as the shadow? Were is the back lip of the vase? Why would you stamp something in solid black and then try to color it? I wandered off and did my own thing, but it was not an improvement. This will not be remembered as one of my favorites.

Juliet Arrighi

Catasterism

Someone once told me many years ago that when a person or creature is turned into a constellation, the word for it is "catasterism". This is one of those words, like "defenestration", that you wonder why it even needed to be created. I assure you that this is the first time I've needed it in over twenty years.


The cat is mine, the stars are Hubble's. The photos, I mean; the cat and the stars belong to the Lord.

This did not print well at all on my printer at home. I'm thinking about sending it to be professionally printed - I think it makes a fun digital ATC.

Juliet Arrighi

Happy Bee Day

This was a very summery image that the Artistic Team given to play with at Designed2Delight, but frankly, with last weekend's blizzard and the snow that is falling right now, I needed a little summer.


The flower embellishments were cut from the sentiment that comes with the image. I used some gold stickles and stardust pen to glitz up the image, and the sentiment is from a TAC set. The bees fit the theme of Animals over at the Paper Popsicles blog.I made this card to give to a friend of mine on Thursday, assuming that we can leave the house by then. We are supposed to see another foot of snow tonight.

Juliet Arrighi

Long valentine

My cat ate my cards.

Seriously, if a card falls off my computer desk, she will start chewing on it, so I have to be careful to move them away after I scan them. Sometimes she will jump up and deliberately knock a card to the floor just so she can start chewing on it. I had several long cards that I wanted to use in my mailings today, because I like to nestle my ATC swaps inside long cards, but I couldn't find them, and so I feared the worst - my cat must have made off with them.

Thus, I needed a long card. I had a recipe challenge from the Crafty Pad, and all my glitter papers and Embellishments from the Target One Spot still out, so ZAP!!


One fancy edge (Martha Stewart punch), two (glittered foam) hearts, and three patterned papers. Not exactly tasteful, but it certainly gets your attention. Now, if I can keep it from getting my cat's attention...

Juliet Arrighi

Using it

You may recall that a couple of days ago, I went to Target and spent $3 on scrapbooking papers and embellishments, and to justify the expense, I told myself I would have to make 3 cards. I made one a couple of days ago, and now, here are two more. In addition, I used a highly unlikely focal image for the papers I bought - a vintage valentine that I picked up from the Graphics Fairy.

Here is the first card, using a sketch from Sunflowers and Dragonflies:


It also uses a glitter heart that I bought at the Target One Spot last year. I love the One Spot. The word stamp was a freebie from TAC.

This card follows the Get Sketchy sketch this week.


I really like how the snowflakes on the Christmas paper match the doilies on the Valentine paper in the K&Co stack. The Chipboard hearts were my One Spot purchase.

Whew! Now I can enjoy the rest of my cheap goodies without guilt!

Juliet Arrighi

Paris

These are not the greatest drawings I've ever done, but they are inchies, and there is a limit to what you can do on an inchie.


My husband was able to recognize about half of these locations - how about you?

The Saturday Spotlight is on teeny tiny, you can't get much smaller than an inchie.

Juliet Arrighi

Cheap and sparkly

Last time I was in Target, I found some valentine themed paper in the dollar bins, along with some embellishments, and as I was driving home with these little goodies, I said to myself "I need to make at least three cards with this stuff to justify the three bucks I spent". Then I thought that for an additional challenge, I should make something other than a valentine.


The background paper and the cardboard sticker that says "happy" are from that purchase. The stamp and the huge purple rhinestones are from Dollar tree, as are the holographic stickers I used to spell "Birthday". I used glitter pens and the blended glitter technique to color the image, and to do some faux stitching around the edge. It isn't gorgeous, but you can't complain about the cost of the materials!

Now, who needs a cheap and sparkly birthday card?

Juliet Arrighi

Usagi

Cat and I have been working on Zindorf tutorials, and a few days ago, I picked this one to try. Cat objected, saying she wanted to do the one we ended up doing two days ago - the tutorial featured rabbits, but since I already decided I wanted to do owls, I did it with owls. Cat did hers with a rabbit. Then (and this is the part that cracks me up), she says that she wants to do the original owl tut that I picked, because she already stamped the owls.

Well, since I already used owls with the rabbit tut, I decided to use a rabbit with the owl tut. I recalled that in Japan, instead of seeing a man in the moon, they see a rabbit, so I took that as my inspiration for this ATC - a plain brown hare striving to transcend the mortal plane to fulfill his destiny as the rabbit in the moon.


I took some chances with the color - instead of sticking to shades of blue, I used some green and purple to develope the color of the sky. I used gold embossing on the leaves and some gold metallic accents on the rabbit to symbolize his spiritual journey.

I had another reason to make a brown and purple ATC as well - it's the challenge this week at Fun with ATCs.

Juliet Arrighi

Owl always love you

It's the beginning of the month, which means a new free digital stamp at Designed2Delight. If you make a card with it and post it by Monday, you get a free digital stamp next week. If you use that stamp, then you get another one the following week, and so on. It's a great way to collect digital stamps, and it is a great way to get the experience of being on a design team without the stress.


I used another Zindorf tut for this one, although I changed so many things in the tutorial, I doubt Michelle herself would recognize it. I did, however, attempt to use SU inks on this one, thereby learning that spots and brayers don't mix.

Juliet Arrighi

How many inchies can you fit on an ATC?


6 inchies.

Juliet Arrighi