Double kissed ATC

DISCLAIMER - my shift key is busted.  If it isn't on the first row or accessible with my capslock, I can't type it.

Kissing techniques - the first one I was forced into.  Too much colorwash spray on one piece of watercolor paper inspired me to 'kiss' it to another piece to spread the ink around a bit.  Once I had kissing on the brain, I had to try kissing my stamps, too.  The solid bird is from nordic noel by AMuse Studio, and the leafy branch which I used both for the kissing and for stamping around the edges is bird on a flowering branch by SweetStamps.

I used a waterbrush to drag the ink on the leaves around, and a tiny bead of embossing frames the image.

Challenges -
Ugh - I need a new keyboard...

Juliet Arrighi

Stitched snowflake ATC

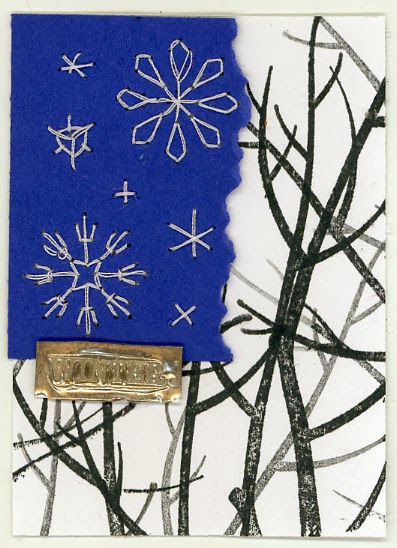
The altereddesigns group challenge this week was to make an ATC with sewing on it. I have a punch that punches holes so that you can easily embroider flowers onto paper.  It occurred to me that it could be used to stitch snowflakes just as easily.
I used the punch for the big ones, and did the smaller ones freehand.  I had a hard time figuring out what I could do to make the the snowflake panel into a complete ATC other than framing it with layers, but then I looked out the window, and saw the trees with their bare branches.  I used the seasonal branch stamp set from AMuse Studio and the depth of field technique to stamp the branches, and then I used the faux embossed metal technique to create a tiny embellishment to tie the two parts together.

Challenges:


Juliet Arrighi

Zentangled flower

This was inspired by a card on Pintrest that a friend forwarded to me.  I don't do Pintrest, but I did like the card, and it inspired me to make this one.
The stamps are all from AMuse Studio, and instead of coloring, I zentangled inside each petal.  If it looks like I cut the flower out and layered it on, that's due to the faux shadow I created with a bit of pencil.  It's a single layer card, no embellishments, no coloring, and still, I am very proud of it.

Challenges:


Juliet Arrighi

Calendar ATC

I'm still here - I just didn't want my Christmas cards to be seen by the people who were going to get them before I mailed them!

My altereddesigns group had a challenge to make an ATC for New Year's, and I really don't have any of the celebratory feelings about the new year that most people do - it's really just the end of the holiday break ,and time to hang a new calendar.  I decided that is what I would do with my ATC:
It is super easy to make a little calendar; I have been using this free program for years.  for the backing, I just used some paper tape in layers, then diecut the numbers from a Tim Holtz alpha die, and the swallow die is from AMuse Studio.  The Tiny Attacher has the perfect size staples for this calendar.  I hope it doesn't get stuffed in an ATC folder - it is too useful for that!

Juliet Arrighi

Cabins in the forest

I had this idea for weeks before I sat down and actually tried it to see if it would work in real life the way it did in my head.  It's simple math, really, but I have been known to forget parts of the equation.  Anyway, I wanted to make a little forest of trees, and then I decided that I wanted a cabin or two in there as well.  I decided to use my ugliest green scrapbook papers for my test run.


Since the tree die is asymmetrical, you need four diecuts for each tree - two cut from the front side of the paper, and two from the back.  Stick them together on the sides, alternating the front cut trees and the back cut ones.  after you get all the sides together, I recommend a dab of glue at the top.  You can get 5 trees out of two sheets of scrapbook paper.

After doing a few trees, I felt that having just a forest was boring, and that I needed a cabin or two. However, I dreaded creating and printing a template.  Suddenly I remembered the Michael Strong mosiac frame had a strong geometry similar to what I needed to cut the bases of the houses, and I realized I could simply stamp the stamp and use that for  template.  I have created this diagram so you can see where the cuts are on the stamp:
 This makes two bases.  The next diagram shows where the folds and the glue have to go:
The roof was cut from another scrap that was 1.75 by 4.5 inches.

So you are probably thinking that I should now be ready to make this with my good paper, and it would be a lovely little scene.  I agree, however, I think it will be a fun craft project when all my kids are home from school - we can all make trees and cabins together.  I know from experience that I can't have my best work waiting as a sample - if mine looks too good, they won't bother to play with me.  Mine has to make them think that theirs will be better.  Therefore, the good trees and cabins won't be ready for a couple of weeks, but you get the general idea of how it goes.

If you would like to try this and you have any questions on how to do it, just ask.
Juliet Arrighi

Trees in the windows

This was a hard technique to photograph.  Can you see what I did in this photo?
Other than the fact that I have stuff piled up on my counters, and a cat condo, and my son's bookbag on the floor, can you see what I did to the panes in my french door?

You may think I'm crazy for stamping on my windows, but really it's is very simple to do - I used acrylic matte medium, applied to the stamp with a brayer.  I don't know if you can see it well enough, but it looks like etched glass.  It isn't hard to remove, either - it will come off easily the next time I wash my windows, as the matte medium dissolves easily in water.

The cloisonne stamp is perfect for this technique, because of the bold lines.   What a quick and easy way to add a holiday touch to my home!
Juliet Arrighi

Cookie jar sleeve

I have a blue cookie jar which looked really good in my kitchen when I had wallpaper, but now looks nearly invisible now that I have painted blue walls.  However, I have come to love it and the unique sound it makes when one of my kids is sneaking a cookie - I can pick out that sound from almost anywhere in the house.

Anyway, I was filling it with some freshly baked white chocolate chip macadamia nit cookies when I decided that the cookie jar needed be as festive as my cookies.  It took a single sheet of scrapbook paper and scraps of cardstock that I had lying about.
The christmas trees were the diecuts I had leftover from the luminary card I showed you on Monday.  building a snowman out of paper scraps is nearly as much fun as making one out of snow, and not nearly as chilly.

Just looking at my cookie jar makes me want to bake!

Juliet Arrighi