Showing posts with label 12 tags of Christmas. Show all posts

Tag suitable for mailing

I tried another Tim type tag, with the idea that it could fit into a normal envelope for mailing.
I love this background paper from a•muse studio - the print is small enough that it looks like book text, but it has "T'was the Night before Christmas" written in paragraphs on it, so you never have to worry about strange text showing.  It has a nice ivory color, which looks good plain or burnished with distress ink, like I did here. all the stamps here are a•muse studio, too. I used the Blended Glitter and the Faux Vellum technique from the Technique Junkies newsletter; the burnished emboss resist is a basic Tim Holtz technique.  The framed sentiment is from CTMH.  It has a little dimension from pop dots, but nothing that would upset a postal machine.

Challenges:

Juliet Arrighi


Tim type tag

Tim Holtz isn't doing 12 tags of Christmas this year, so neither am I; but one of my yahoo groups is having a Tim tag swap, so I had to make one.  It has a big Tim flower for the homemade flower challenge at Amusing Challenges.
Yes, it is deeply dimensional, and loaded with metal dangly bits.  You can see the NOEL clearly when the silver isn't reflected straight at you.  Now here is the problem - I don't see how in the world I can mail this to anyone for less than $5.  I like it, but I think that is a little steep for a single item swap.  It's silly not to enter the swap after I've made the tag, but really...

Challenges:
Fussy and Fancy - Christmas
CCEE Stampers - new die (spellbinders foliage)
Crafty Ribbons - tag
Do You Stack Up - silver and gold
In the Pink - pink Christmas


Juliet Arrighi


12 Tags pennant style: Day 12

Tim's last tag of the year was not great - a tissue flower, and one of those weird dolls without any arms, and no color to speak of.  I decided to use a backgound with more color in it, and set about making a tissue flower (really you can stamp on tissue, you don't need to buy it reprinted), when I realized that I didn't like tissue flowers.  They just look more crumply than flowery, and I didn't want a thick embellishment on my pennant, either.  I thought about what I really wanted on a pennant that I hadn't used yet, and realized that I hadn't done  a dreidl yet.  I made my dreidl out of some scraps of painted paper I had lying out, and it all came together very quickly after that.
My hebrew lettering leaves something to be desired.  You can still tell it's a dreidl, though.
Juliet Arrighi

12 Tags pennant style: Day 11

Sorry that I fell behind - My husband came home from his business trip and immediately wanted to know why I wasn't being more productive.  Apparently, making these pennants does not qualify.

Anyway, Tim did an interesting technique using UTEE and shrink plastic.  Trying to copy his technique reminded me of all the things I both love and hate about working with UTEE.  The candles below are made with the shrink plastic technique - the color is from the burnt UTEE.  Double-dipping the tips is what gives them the melted candle tops.  The menorah is punched from cardboard and heat embossed with platinum UTEE in the traditional way.  The textured portion on the base is a happy accident - I don't know why that particular area wouldn't melt right, but it looks good.
I would like to remind everyone that any plastic that has a 6 in the recycling emblem will work as shrink plastic.  I used a cookie tray from a bag of Oreos.
Juliet Arrighi

12 Tags pennant style: Day 10

Tim did a packing tape transfer onto foil for his technique today.  I was pretty thrilled, because I love packing tape transfers, but mine did not come out nicely.  In fact, it shredded.  I always use the thinnest possible paper for my transfers, so using the thick printed cardstock  gave me a lot of problems.  I finally threw up my hands and finished the pennant using an older technique where I just glue images to fragments and make ornaments that way.

Fragments are even thicker than ribbon bows, so I didn't hesitate to use gold braid on this pennant.  I would like to make a comment about Tim's seasonal stack, in fact all his stacks - the colors are dim and gray-bluish.  It put me off using them until it hit me - they only look good after you distress them, and a yellowish ink, like the antique linen or the tea dye, balance out the bluish gray and bring the color into a normal, usable range.  This is such a Tim Holtz thing to do, to create papers that need to be distressed.
Juliet Arrighi

12 Tags pennant style: Day 9

Tim taught us a very cool double embossed background today.  I got an interesting effect with my background stamp, but it was a little too grungy to use completely unembellished, so I gave it a little something something.
It's not Tim style, but it makes me happy.

Juliet Arrighi


12 Tags pennant style: Day 8

Tim did a steampunk tag.  I have not ever done steampunk, and today proves why.  Tickets, clock hands, vintage advertising and gears do not automatically make a paper project steampunk.
Ugh.  As much as I wanted to use the Santa's Flight stamp on a pennant, this was not the right one.

Juliet Arrighi

12 Tags pennant style: Day 7

This was not Tim's best tag day.  Consequently, this isn't my best day either.  He buried his flaws under a big bouquet of froufrou, but I am getting tired of froufrou tags, and did not create the necessary gigantic embellishment with 6 different textural layers.  I did make the distressed background, the embossed sentiment, and played with stuff that I don't normally use for embellishing, in this case tissue from a sewing pattern and some raffia.
It is good to have a few ugly ones - it makes the others look better.

EDIT:

I couldn't stand it any more - this pennant was too muted and bland.  I restamped the bird with black ink and added some more embellishment, including sparkly red crystal stickpins.

Tim, you win this one.
Juliet Arrighi

12 Tags pennant style: Day 6

Tim's tag today is centered on a faux enameling technique on metal.  I didn't have any metal today, not even an old aluminum can (recycling pick-up was yesterday), so I used another enameling technique.  This one involves 3 colors of embossing powder.
At the very top (this is the gutter, it will either be covered or cut off) you can see the original color of the cardstock.  after three layers of clear EP, the surface was smooth and dark.  I then stamped versamark snowflakes on the clear embossed surface, and embossed that with silver EP.  Finally, I stamped and embossed white snowflakes on top of that.  each layer sinks into the previous as you heat it, giving the appearance of a smooth enameled surface.  I didn't want to cover it all up, so I just added a bow and small charm.

EDIT:

Maybe less is more.  Here is how it looks without the bow. (If you think it was better with the bow, say so in the comments)


Juliet Arrighi

12 Tags pennant style: Day 5

Tim's tag today featured a relatively complicated background with a  simple diecut wreath on it.  I decided to go easy today and just cut a sheet of printed cardstock for my background, and focus on the wreath.  I didn't have the die (no surprise there, eh?), but I did have a pine branch punch that I had intended for years to use in this way.
There are a LOT of little punched branches there!  I used Core'dinations cardstock for the branches so I wouldn't have to worry about white edges.  I could have done more, but it didn't need it.

Juliet Arrighi

12 Tags pennant style: Day 4

Tim's frosty, painted tag had a lot of layers of paint and texture on it, and I tried to do the same, but it just wasn't working.  Also, my son Gordon disapproved of the monochromatic look of the snowman and insisted I give him more contrast.  I think Gordon was right.
The embossing border is not waste plastic, but waste aluminum for a drink can.  The limbs of the snowman are cut from the branches of a punched tree.  I accept that not everyone can draw a deer, but really, anyone can draw a snowman.

Juliet Arrighi

12 Tags pennant style: Day 3

Tim's tag featured a subway art stamp with a matching embossing folder, and his ever popular custom stamp pad technique.  I've never done the custom stamp pad, nor do I have the subway art stamp and folder, but I do have a tool I like to use - Paint Shop Pro.  I downloaded some subway art here, modified to to fit on a pennant with PSP, and then glittered up the words that I printed out.

I passed on the holly, because I did that two days ago, but I did throw some stars on there, mostly to cover up spots of smeared glitter/ink.  As Tim says, "Mistakes are opportunities for creative embellishment".  
Juliet Arrighi


12 Tags pennant style: Day 2

Tim's second tag featured a diecut deer.  I don't need no stinkin' dies; I drew and cut out this myself.
I made the wreath out of lumpy yarn, dragged through my distress ink pad to darken it a bit.  The green at the edges of the pennant is some green cardstock I used to back the thin music paper.  I could have trimmed it closer, but I liked it showing.

Juliet Arrighi

12 Tags pennant style: Day 1

It's December, so Tim Holtz is doing his annual 12 tags of Christmas. Last year I didn't bother, because I never did anything with the tags from the year before, and I didn't want a bunch more tags sitting in a box taking up space, but this year, I had a plan. I'm participating in a pennant swap, which will give me a few nice pennants for a short string, but I thought that if I made Tim's tags into pennants, it would flesh out the collection and make a really nice display. Tim's first tag featured a Noel die cut, which I didn't have, so I cut my own Noel freehand.


I also didn't have the die to cut and make a pinecone, but I did have some red glass beads and some punches.  Cool trick - to cut holly leaves, use a scalloped edge scissors but turn the scallops to the inside.


Juliet Arrighi

Not so metal flowers

A couple of days ago,  one of my stamp enablers suggested a shoebox get-together, which is to say, we create a card, put all the materials to make it in a single shoebox, and let everyone else make a card like ours.  I opened my mouth before thinking and said I would do a Tim Holtz style card, which was met with some approval, but after I got home, I realized what an insane prospect that would be.  Everything Tim Holtz designs is created with the idea to use as many of his products as possible at one time.  It would be silly to try and fit all things necessary for a Tim Holtz card in a single shoebox.

However, I was not going to completely abandon my original idea.  I have done nice things with Tim stuff that weren't strictly Tim, and looked through my past photos and scans for some inspiration.  I stumbled across this old tag:


I remembered that I particularly liked it at the time because instead of running out and spending 20 bucks on Tim's metal flowers and metal corners, I made my own out of cardstock.  I think my flower-making skills (all my skills, actually) have improved somewhat over time, so I decided to base my card on this tag.

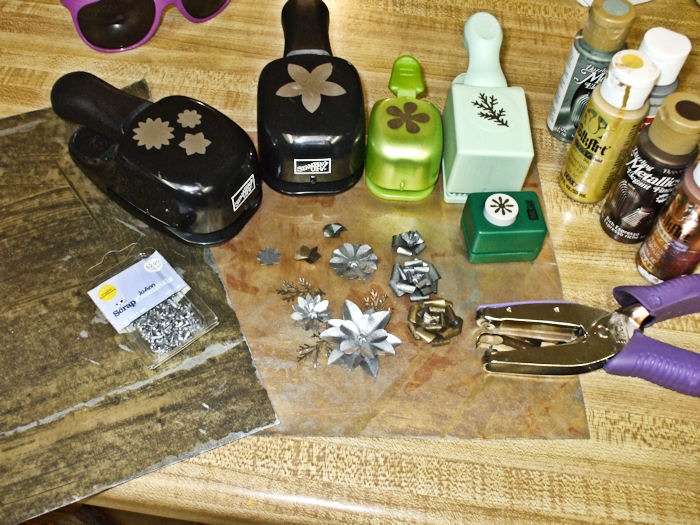
The first thing I needed to do is make "metal" cardstock.  For me, that involves metallic paint and black or brown cardstock.  Then I whipped out the punches, to create the components.  Here is all the stuff I used:
The two colorful pieces of cardstock that you can see underneath are how they look dripped with paint and the colors smeared around with a credit card.  as blotchy as it looks as a big sheet of paper, punched into small pieces, it looks tarnished - everything Tim needs to look old, right?  Here is a close-up of the flowers:
 The reflection makes it look particularly shiny, but actually, it looks like tarnished metal.  I made some dimensional flowers, and then I realized that maybe a mailable card would be better, so I worked on some flatter flowers (the ones on the left will all lie flat in an envelope).

Obviously, I will bring the cardstock already painted, but now I am wondering if I should punch all the flowers, too, and just let the other players assemble them.  This is just the flowers - I also have to consider how I am going to do all the other parts, as well.  Damn you, Tim Holtz, and your dementing effect on my brain!
Juliet Arrighi

Lulu tag

I just joined the CS Designs group at Crafters Digital Art Center - It's a ning group, which means it's impossible to figure what is going on half the time, but if you like digital freebies and tutorials, there is a lot of good stuff in there.

Anyway, Chris (of CS Designs) gives the members of her group the Lulu Fashion Diva digi free for joining, so I felt like I ought to make something with it.
It's way different from what I usually make, but it was fun to put together.  I can always use a tag.  It's done with the Blended Glitter technique, and a bunch of ribbons, felt flowers, and stickers that have been sitting on my crafting desk unused for a long time - it's been a while since I've done anything like this!

There are other Lulu stamps here, if you like this style.  Chris has a lot of really different and fun stamps!

Challenges:
Crafty Emma - fairies (according to the CSDesigns website, Lulu is a fairy)
Fairy Tale - flowers
Stamp Something - cute
Tellen's Place - polka dots
Wags n Whiskers - Fairy
Little Red Wagon - one layer

Juliet Arrighi

Cutie tag

Cora is offering this freebie for Valentine's Day, so I made a little tag with it.


It is loosely inspired by this Wendy Vecchi tag. It also fits the ribbon Challenge at The Pink Elephant.

Juliet Arrighi

12 tags of Christmas - day 12

I never did finish the Tim Holtz series, so I thought I'd better get on it. Tim's last tag had two giant roses on it, but I had already switched the flowers on tag 11 to roses, so I thought I would do flowers with pictures in them for tag 12.


The images are from Lisa Volrath, her anniversay collage sheet. the crepe paper rosette idea is hers, too, from The Monthly Muse. This tag was fun to make, once I committed to doing it. Now, to photograph the whole lot of twelve and email them to Tim...

Juliet Arrighi

12 tags of Christmas - day 11

To be honest, I didn't particularly like the three flowers that Tim used on his tag today, even though they comprised both of the new techniques he was trying to demonstrate. Santa's face just does not need to be in the center of a flower. I decided to make more roses similar to the metallic ones I did on the Day 2 tag, and I thought that a dove might be more likely to fly than a reindeer, and somewhat more necessary, considering the state of the world.


I stamped and embossed the dove on Vintage Silver Lustre cardstock from PaperTemptress, and the dove and word stamp are from a retired SU set. I don't like Su much, but this is the best dove I've seen on a stamp - not to big or small, not too realistic or cartoony, just clean and simple and elegant, and as much as I like stamping this dove on white, I think it pooks even better on the silver lustre.

You can see the star brads i'm using to hold the roses together on one of my roses. The directions for these roses are best described by Valita.

Juliet Arrighi

12 tags of Christmas - day 10

When I saw Tim's embossed metal tag, three little words popped into my head - Cuttlebug Embossing Folder.


It's a birthday folder, but isn't Christmas supposed to be a birthday? I used the Stained Glass Foil Technique from the December 2002 TJNL - the technique predates the Cuttlebug embossing folders, but the basic idea is there - you don't need Ten Minute Metal, you can use ordinary kitchen foil. I used my ghetto copics to color in the recessed areas, and I found I could wipe off the smudges on the high areas with Stazon cleaner - I don't know if that is a helpful tip for anyone. It's a fun little tag - I love the colors!

Juliet Arrighi