Cheryl's Shoebox

Cheryl had so many fun techniques in her card!  I have baker's twine, but I haven't used any of it yet.  I certainly never thought to use it like this!  I also love the huge grommets and popped sails, they add so much dimension!  This will be a great birthday card for my son, Ben, who just got his Class B sailing permit last summer.

Juliet Arrighi

Lois's Shoebox

I've been talking about the shoebox swap for almost a week now, and today I went and had a great time.  The first cards I want to show you were ones that Lois offered.  The other players all had special techniques or stamps that they wanted to showcase, but Lois gave us the basic materials for two different cards, and let us customize them to our own tastes; I really feel a sense of ownership over the art in these cards, and not like I just assembled a kit.  Thank you, Lois!


Juliet Arrighi

Tim Holtz style

Tomorrow I have a shoebox event with some stamping friends, and today I was putting the finishing touches on my card.  One of the important elements of this particular card is the gold splatter.  Splattering is terrible at shoebox events, because nobody wants to get splattered.  I tried other ways to get that same look, but there was no help for it.  I had to splatter.  Tim uses Perfect Pearls, but I have Stargazers.  Stargazers won't be too bad.  It doesn't stain, and wipes off of hard surfaces, no problem.   Since we will be doing this in a kitchen, this should be fine.   We have to get up to emboss, so getting up to splatter shouldn't be an issue.

I did some test runs on ATCs before doing the sample card, just to make sure I wasn't forgetting how to do it.

It took me a while to figure out how to do the mitered faux metal corners, but now I really like them - I might use them a lot.  I also decided that it was easier to glue the flowers together than to attach them with a brad.

I can't show you the sample card until tomorrow - a couple of the ladies read my blog, and I don't want to spoil the surprise too much.  One of them might lock me out when she reads about the splattering, though (it's her house!).   I really like building up a background like this - it has a lot of texture for what is essentially a single layer card.

Challenges:
Clear  It Out - clean and simple (okay, maybe not too clean)
Creative Craft - make your own background
Deep Ocean - flowers
Going Grey - anything but a card
Tip Top Tuesday - T is for Tim Holtz Technique
Cheerful Stamp Pad - favorite background


Juliet Arrighi

Postage stamp inchies

I needed to make some postage stamp inchies, and I found enough patriotic postage stamps that I decided to use them for my 4th of July inchie mingle, too.  Here are my patriotic ones:
You have to love postage stamps - they are little works of art in themselves.  To make them my art, I just put them on a gold leafed background and added a touch of bling.  The other stamps were harder, because not everything looks good with a star on it.
The stamps are so big that in order to see any background, I had to offset them.  I thought adding an alpha gave them some cohesiveness.  Finally, I had one stamp left.  This inchie is for a special friend:
Challenges:
Fairy Knoll - sparkle
Fairy Tale - America
Off the Wall - red, white, and blue
Stamp Something - red, white, and blue
Craft Us Crazy - red, white, and blue
Paper Play - stars and stripes
Stamp Insanity - stars and stripes
Divas by Design - anything but a card

Juliet Arrighi

Airplane inchies

One of my girlfriends reminded me that it was almost the end of the month - did I remember that there were mingles due?  One of the mingles was travel themed, and since I had already made metallic cardstock, and had my punches handy (including my my loved but rarely used airplane punch.  Why do I love it?  Because I used to be an air traffic controller.  Why don't I use it?  Because I don't think anyone but me would appreciate a tiny little airplane on their card) , and my desk was a total mess, I thought I would make airplane inchies.  The messy desk is relevant because near my elbow was this lovely scrap of rainbow brayered cardstock which was begging to be used as a background.
I liked them, but I didn't know if anyone else would.  So I did the test - how would they look on a card?
I like them on a card, very much.  Maybe I will send the completed card, and not just inchies.  Note:  metallic doesn't scan well.  Very shiny in real life, though - just see my previous post.

Challenges:
Bloggers Challenge - things with wings
Fun with Shapes and More - lilac and pink
Poodles Parlor - come fly with me
Simply Create - fly with us
4 Crafty Chicks - clean and simple
Shopping our stash - neglected tool
The Sketch File - sketch
The Cheerful Stamp Pad - things with wings
Pollycraft - travel


Juliet Arrighi

Not so metal flowers

A couple of days ago,  one of my stamp enablers suggested a shoebox get-together, which is to say, we create a card, put all the materials to make it in a single shoebox, and let everyone else make a card like ours.  I opened my mouth before thinking and said I would do a Tim Holtz style card, which was met with some approval, but after I got home, I realized what an insane prospect that would be.  Everything Tim Holtz designs is created with the idea to use as many of his products as possible at one time.  It would be silly to try and fit all things necessary for a Tim Holtz card in a single shoebox.

However, I was not going to completely abandon my original idea.  I have done nice things with Tim stuff that weren't strictly Tim, and looked through my past photos and scans for some inspiration.  I stumbled across this old tag:


I remembered that I particularly liked it at the time because instead of running out and spending 20 bucks on Tim's metal flowers and metal corners, I made my own out of cardstock.  I think my flower-making skills (all my skills, actually) have improved somewhat over time, so I decided to base my card on this tag.

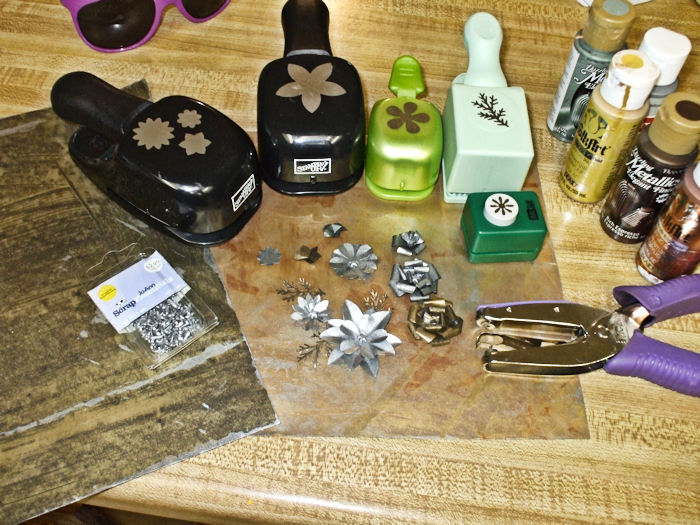
The first thing I needed to do is make "metal" cardstock.  For me, that involves metallic paint and black or brown cardstock.  Then I whipped out the punches, to create the components.  Here is all the stuff I used:
The two colorful pieces of cardstock that you can see underneath are how they look dripped with paint and the colors smeared around with a credit card.  as blotchy as it looks as a big sheet of paper, punched into small pieces, it looks tarnished - everything Tim needs to look old, right?  Here is a close-up of the flowers:
 The reflection makes it look particularly shiny, but actually, it looks like tarnished metal.  I made some dimensional flowers, and then I realized that maybe a mailable card would be better, so I worked on some flatter flowers (the ones on the left will all lie flat in an envelope).

Obviously, I will bring the cardstock already painted, but now I am wondering if I should punch all the flowers, too, and just let the other players assemble them.  This is just the flowers - I also have to consider how I am going to do all the other parts, as well.  Damn you, Tim Holtz, and your dementing effect on my brain!

Juliet Arrighi

Spiral to donut

My daughter caught me beading on the deck, and snapped a picture.  Click to enlarge.
It's not the best picture of me ever, but you can see that I am wearing a necklace that I made, and also that I am making something else - a spiral (thanks, Vicky!).  My daughter didn't like the spiral.  I don't know why, if it was the shape of the color, but I could see that I didn't want to make a long rope of it like I originally intended, so I brought it around and made a donut.
I think this will make a nice focal bead, and plan to make some smaller beaded beads to complete a necklace.  I will have to use some other pattern to make the rope necklace that I want.

Juliet Arrighi

Ndebele stitch

I have wanted to try the Ndebele (herringbone) stitch for a long time, but I couldn't find a tutorial that explained what happens after the first four rows.  Then I found a tutorial that was a lot less tightly woven but easy to understand.  I thought I would give it a try with some cheap beads that I had bought at Michaels, and after a dozen or so rows, understood what I was missing in the other tutorials.  I worked it tighter and tighter as I went, and finally brought it around to see if I could invisibly join the ends.  The pattern doesn't naturally twist, I just thought I would throw that in with the rest of the experimentation.
The packet of beads I was using had five colors, and since I only used three for this bracelet (too small for adults, only 6 inches around on the inside); then I tried it again with just using two colors.
I like the width of this one.  It might be good for a rope necklace.  I don't know why I'm making these tiny bangle bracelets that no one can wear.

I want to figure all all the complexities of this stitch before I break into the new stash of crystals I bought yesterday at the bead expo.  I will also say that this stitch eats your thread like crazy.

I also saw two other patterns at the expo that I want to try - tubular netting with inset pearls, and the Russian spiral.  I also picked up some fun lampwork beads, and a packet of tila beads (thanks, Jeannie!).

Yes, going to the bead expo does mean that I will be doing a bit more jewelry before I make more cards.

Juliet Arrighi

Green bead necklace

A while back, they had these bracelets at Target with big green beads and little chinese coins as spacers.  I liked the little coins and cut the bracelet apart to get them, and then had no idea what to do with the beads.  They are a strange green color, unlike any of my other green beads.

Today I was looking at a different dubious purchase, a small packet of reject beads that I got on clearance.  As sometimes happens when you have glass beads in a little baggie, there was glass dust in the bag which made the beads look dusty and ugly. I have seen it often enough to know that these are real bargains - the glass dust cleans off easily, and the beads look great once you can see them.  So, I had this 50 cent bag of little glass beads, and I was trying to figure out what to do with them, and I looked at the green beads, and it hit me.
I couldn't get it to lie neatly in the scanner, but basically it is four strands of these purplish little beads held together with the big green beads.  The purple and green are both off in the same way, and it really works.  Sometimes I surprise myself.


Juliet Arrighi

Playing with jump rings

I bought some cheap colored jump rings ar Michaels a while back, just to experiment with chain maille techniques.  I finally committed to opening the packaging and putting some of the links together.
These links are of poor quality, not suitable for wearing, but they come in packages with 5 different colors in them, so if you want to practice a pattern before doing it in earnest, the different colors are very useful.  I don't think I could have done this with all one color without practicing with the color rings first.  I'm also beginning to see the merit of rubber jump rings.  About half the rings in this piece do not need to open, and if they were made of rubber, it would have enough give so that one could put on a bracelet without a clasp.

Juliet Arrighi

Peruvian Necklace

Over a year ago, I went to a bead store and fell in love with some Peruvian clay beads, and found some gemstones that went with them, and a large donut to hang in the middle.  With the finished product firmly in mind, I came home, stashed the beads away and forgot all about it.

Today, my aunt Ena came over to visit with my mother and me, and to craft.  Ena was stitching together some knitted afghan panels, my mother was upcycling more Christmas cards (she will be leaving tomorrow with over 50), and pulled out some copper wire and went to work.
It came out very much as I had imagined it would.  I think this one will be entered into the county fair this year.


Juliet Arrighi

What's cookin'?

Just playing around with Paint Shop Pro - It's been a while since I made a card this way.  This is for the Dude Time Doodles Sketch challenge.


Juliet Arrighi

More Xmas cards

My mother and I have been going crazy upcycling the old Christmas cards into new ones.  Some are really difficult, like photo cards.  The ones my mother hates the most are foiled cards.  Here are three cards that I made from one foiled card - the scans are not great, because the foil doesn't scan well, but you will get the idea.

The card featured three Santa ornaments in blue, red, and green.  At first, I thought I would only use the red, because I'm a stickler about such things.
It wasn't much of a remake - I just cut a rectangle out of the card front, and layered it up.  I hated to see the other two Santas go to waste, though.  I tried fussycutting them:

The sentiments are leftovers from other cards.  I don't think any of these cards are particularly great, but my mother thinks they are good for a dollar.  Whatever.  It's about keeping them out of the landfill another year, I suppose.

Juliet Arrighi