Come fly with me

The come fly with me stamp set that amuse studio sells features an airplane, but I thought the sentiment worked just as well with a bird.
This technique (Inked Shadows from the TJ newsletter) uses the negative of the die cut and a painted background.  It also uses a LOT of pop dots.  It came together fairly fast, as I already had the painted paper (I make lots!).

Challenges:

Juliet Arrighi


Cardinal ATC

I needed a winter bird ATC, so I used my old TAC cardinal - my favorite winter bird stamp, if you don't count the doves (doves are awesome for Christmas).
I will say I had problems.  The background is some white paper that I painted silver, for the shimmer and for the brush strokes (I love the look of a painted background!).  I stamped with Memento black, which took okay, then I tried coloring it with copics.  The copics did not adhere well - when I tried to bring in colors for blending, it took off the original colors.  I then decided to try my glitter pens, because, well, you know how I am with glitter pens.  I then blended the glitter pen ink with my LaPlume markers, which worked surprisingly well.

I couldn't resist framing it with a little bakers twine.  I love the look of the bakers twine with the cardinal!

Challenges:

Juliet Arrighi


Sympathy Snowflake

I usually put butterflies or Dragonflies on y sympathy cards, but this time of year, a snowflake seemed better; their unique and ephemeral nature makes them a good allegory for the fragility of human life (yeah, I'm overthinking it).

I have been wanting to try this technique ever since I got this medallion stamp from SweetStamps:
The parts that look gray in the scan are actually silver.  The large silver rectangle is a piece I painted myself a while back, and the silvery accents on the medallion are done with Stargazers.  All the stamping here is heat-embossed.  I love the look and texture of heat embossing.  It is one of the reasons rubber stamps will never go away.

Challenges:

Juliet Arrighi


Purple Christmas

Sometimes I get tired of every Christmas card being all red and green, so I went with some different colors.  The image is colored with glitter pens and mica powder paints, so it looks really sparkly.  I wanted to go with a low-key background, so I fished through my scraps for pink, purple, and blue to match the color challenge at Blessings Ink, embossed them, and pieced together a nice colorblocked background.
I really like this vintage image from a•muse studio - it's classic without being religious.

Challenges:

Juliet Arrighi


Tag suitable for mailing

I tried another Tim type tag, with the idea that it could fit into a normal envelope for mailing.
I love this background paper from a•muse studio - the print is small enough that it looks like book text, but it has "T'was the Night before Christmas" written in paragraphs on it, so you never have to worry about strange text showing.  It has a nice ivory color, which looks good plain or burnished with distress ink, like I did here. all the stamps here are a•muse studio, too. I used the Blended Glitter and the Faux Vellum technique from the Technique Junkies newsletter; the burnished emboss resist is a basic Tim Holtz technique.  The framed sentiment is from CTMH.  It has a little dimension from pop dots, but nothing that would upset a postal machine.

Challenges:

Juliet Arrighi


Tim type tag

Tim Holtz isn't doing 12 tags of Christmas this year, so neither am I; but one of my yahoo groups is having a Tim tag swap, so I had to make one.  It has a big Tim flower for the homemade flower challenge at Amusing Challenges.
Yes, it is deeply dimensional, and loaded with metal dangly bits.  You can see the NOEL clearly when the silver isn't reflected straight at you.  Now here is the problem - I don't see how in the world I can mail this to anyone for less than $5.  I like it, but I think that is a little steep for a single item swap.  It's silly not to enter the swap after I've made the tag, but really...

Challenges:
Fussy and Fancy - Christmas
CCEE Stampers - new die (spellbinders foliage)
Crafty Ribbons - tag
Do You Stack Up - silver and gold
In the Pink - pink Christmas


Juliet Arrighi


Three of these things are not like the others

One of the benefits/problems with entering a challenge late is that you can see what everyone else has made before you make your own.  In this particular case, everything normal (i.e. butterflies, flowers, snowflakes) that fit in this sketch had been done be someone else.  Then I found myself die cutting these trees out of various scraps on my desk, and I thought I would give it a shot.

Well, sometimes you follow a sketch to the letter, and sometimes it just inspires you and you start wandering off in your own direction.  It's been a while since I put that much ribbon on a card!  The gold background piece isn't a patterned paper, it's a scrap of something I painted myself.  As much as I love patterned papers, making my own papers is fun!

Challenges:

Juliet Arrighi


Popped Tree

I have a lot of dies of a lot of types, but I have to say that my favorite is this tree die from a•muse studio.  It cuts like a dream through any material I apply it, and the die cuts just fall right out.  I made a couple of cards with it today, playing with some some Christmas patterned paper.
With this one, I cut three trees out of patterned paper and glued them together to make this popped tree.  It lies flat for mailing, but will bounce back up when it comes out of the envelope.  The sentiment and flourishes are punched, so the only stamping on here is the sentiment.  

Challenges:
Juliet Arrighi


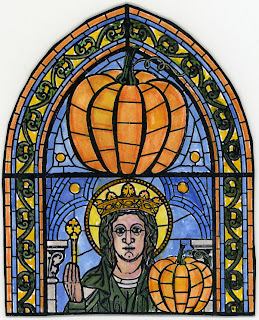
Our Lady of Gourdes

One of my yahoogroups is having a swap - an arch card featuring a pumpkin.  The swap did not appeal to me at first.  I'd never done an arch - they always seemed baroque or even gothic to me, and I didn't see a pumpkin in that setting.  Then I was looking at an arch stamp I own and had never inked, of an angel holding a lamb, and I thought it would be hysterically funny if I replaced the lamb she was holding with a pumpkin.  How to do it?  I decided that it was not possible to do well with a rubber stamp, so I looked for digital images I could manipulate.  I found a free coloring book page of a stained glass window in Chartes and a clipart of a pumpkin, and it all just came together.
I colored it with the Penciled Twinks technique, so it really sparkles.  I have a few people who might find this as funny as I do, so I saved the basic image as a free digistamp, which you may download by clicking the thumbnail below.


Challenges:

Juliet Arrighi


Fall Tree CASE

I have been intrigued by the number of "Paint and Pour" classes that are offered in my area, but have not yet brought myself to attend one.  If you are unfamiliar with the concept, It is a two hour painting class where you sip wine while you paint (acrylics) and come home with a completed canvas.  The approximate cost is around 50 bucks, depending where you go and whether you have to buy your own wine or bring it, and also the quality of the teachers.  I just can't wrap my head around the idea that you can paint something worth hanging, but the sample paintings on the schedules are all very nice looking.

To mess with my head even further, I have recently discovered that there is a home party company that allows you to have a paint and pour event in your own home!  If anything is more mind-boggling than the idea that a person with no art training and experience can paint something nice in two hours, it is the idea that a person can buy a kit and TEACH others to do it!   Now, there are a few cheats - there are specific step by step instructions, and also a transfer where you can copy the base drawing onto your canvas.  For the same $50 I would spend to paint one canvas in someone else's facility, I figure I can do a bunch of canvases in my own home - I only need the paints and brushes once.  The instructions/transfers are inexpensive, only $3 each.  As I was deciding if I wanted to throw money at this idea, I looked at the site to see what paintings they had available.

I tell you this because one of the paintings is the inspiration for this 4x4:
Mine is done with markers on a scrap of kraft I had when I cut apart yesterday's card (I will certainly make another card or two based on the suggestions I've received; give me a day or two to digest it).  This is the original:
I think maybe I don't need all the paints and canvases, or even detailed instructions - I will just improvise with what I have.

Juliet Arrighi


bad morning for stamping

I don't think everything I make is wonderful.  Some of it is really poor, but I show it all to you, in the interest of mutual encouragement.  For example, I know this card is wrong.  I just don't know why.  I'm willing to make it over if I can make it better, so please send your feedback this way!
 I want to use the kraft cardstock, and the paper tape, and the stamp set, but there has to be some way to use them all that looks better than this.

Juliet Arrighi


Lined background

While at water aerobics, I noticed a mural on the wall of the rec center.  Not only did I like the technique, it seemed like something I could do myself.  So, I gave it a try on this ATC.
I loved the look of it, so I thought I would try it on something bigger, like a card.  Unfortunately, I messed up stamping the sentiment, so I ruined the clean single layer look I was going for.  At least I was able to cover it up.

Would you know it was a cover up if I didn't tell you?  Yeah, probably.  The stamp set is from a•muse studio.  It's a nice way to say "Thank you" without using those exact words.

Challenges:

Juliet Arrighi


Kickin' it ol' school

Remember those techniques that a few years ago everyone was doing and now nobody does them?   That's what I did today.  First, I did flocking.  There are a few people still into flocking, but they are the same people who aren't afraid of glitter - the techniques are equally messy.  However, flocking leaves you with a card you just want to pet over and over, like a kitty.  I used red and white flocking on Santa's suit, and it is so soft!

The second technique I used was the metallic leafing pen - remember when we used to put that stuff on everything?  Now I hardly use it, except on Christmas cards.  It is a lot harder to use on a circle than on a straight edge.

Finally, I stuck a spiral clip on my image and tied a couple of ribbons on it.  I haven't done that in years!  It still looks good, and only hardcore stampers know how passé it is.  The image is from the ever useful holiday tags set from a•muse studio; it's just such an essential set of images for holidays cards, and they all look perfect inside a 2 inch circle!


Juliet Arrighi


Fish on a string

With all the rain, I was feeling bored, and decided to play with my beads.  I noticed that I had a lot of larger beads that were sitting unused for years, and I thought they might look nice strung.  I don't normally do stringing - stringing is to beadwork what salads are to cooking; it's not about the technique, it's the ingredients.

I have had these little fish beads forever.  There are only seven of them, and the store where I bought them doesn't even sell them any more, so I either needed to come up with a design that would be good enough with those few fish, or get rid of them (never my first choice).  Once I developed the pattern for the necklace, I saw that I only needed three of the fish!  I decided the rest would go well on a bracelet.
I like the freshwater pearls and the silver filigree beads on the necklace better than the pearlized glass and rocaille beads on the bracelet, but I used a thick stretchy beading cord for the bracelet, and the holes weren't big enough on the better beads.  It's all right - the fish are finally out of my stash!

Challenges:
Juliet Arrighi


Burnt

a•muse studio has a free stamp set out for Breast Cancer Awareness; you only pay $3 for the shipping.  It has 8 different cling mount rubber stamps in the set, and they are good for other things besides BCA, so it is a really good deal.  I went to a workshop yesterday where we used some of the stamps in the set.  You can see some of the cards we made on Chris's blog, but I will warn you - when you see how awesome Chris's cards are, you won't be able to keep yourself from ordering the set.

As I was embossing one of my cards, I got distracted and burned the paper.  Curiously, the pink paper turned orange where it was burnt!  It happened to be in the center of a flower, so I decided to go for it and burned the centers of the other flowers.
The white embossing powder also changed color to a soft caramel.  The vellum piece covers a spot where the paper was a little too burnt.  It makes me want to deliberately burn other colors of a•muse studio cardstock, just to see what will happen (other than possibly setting fire to my house).

Challenges:


Juliet Arrighi


Cardinal

This card has three things I love:  Vintage Silver Lustre paper from Paper Temptress, an image from The Angel Company (now defunct), and the Woven Bakers Twine technique from the Technique Junkies newsletter.

I was strongly inspired by this image to make a card, but I wanted to make a Christmas card for my stash, so I substituted a cardinal for an owl; the berries made me think of the bakers twine.  It would have easy to dump a lot more embellishment on there, but really, it has everything it needs already - nice shimmer from the paper, texture from the woven twine, and 3 different textures of paper. 

Challenges:

Juliet Arrighi


Ride on

I wanted a quick card of encouragement for my daughter, who is studying hard at college (4th year).  She rides her bike around the grounds, so this stamp set (enjoy the ride by a•muse studio) is perfect for her.


I used the In the Middle technique from the latest Technique Junkies newsletter, and used the leaves from the  marvelous marigolds  stamp set for the fall leaves - I have a lot of leaf stamps, but I wanted the bold image ones for embossing and overlaying.  The sentiment is punched and glued on.  The sentiment was embossed with white, but the white looked too stark against the warm colors, so I colored it with copics.

Challenges:
Allsorts - Autumn colors
Speedy Fox and Friends - leaves
Charisma Cardz -CAS
Inspired by - photo inspiration


Juliet Arrighi


Rosette dare

A girlfriend sent me a photo of a Halloween rosette decoration she made at a SU workshop.  I liked it, and felt challenged to make a similar item. I didn't have the punches and stamps she used, so I improvised with what I had.
The lighting isn't great, but you get the general idea.  I used about half a sheet of CTMH double-sided paper for all the DP in the project.  There was some stamping on the orange cardstock, but most of this is just punching, die-cutting, and glue.  I used a bar coaster for a sturdy base; I would guess the whole project is about 6 inches across.  Mostly, I built depth by curling the paper into cones.  The sentiment is diecut from an old Zip-e-cuts alpha.  This project is 100% paper; no buttons or ribbons or bling.  I even restrained from using metal or glitter!

Challenges:
Aud Sentiments - Halloween sentiment
Crafting for all Seasons - spooky
Decorate to Celebrate - for a Halloween party
Fab n Funky - black, orange, choice
Inky Impressions - anything but a card

Juliet Arrighi


Nordic noel flowers

I love the reindeer in the nordic noel stamp set from a•muse studio, and the dove is great too.  the Noel is perfect, and those tend to be the only three stamps in the set I use.  it isn't that the other stamps aren't good, it's that I don't know what to do with them.  Take, for example, the little flower border - so cute, but what to do with it?  I challenged myself to use it on this card:

The reindeer and flowers are embossed, and the pine branches and snowflake are punched.  A bold image like this is great on a masculine card.

Challenges:
52 Christmas Card Throwdown - colors
Crafty Hazelnut's - snowflakes
I ♥ 2 Stamp - sketch
One Stop Craft - heat embossing
TandaStamps - manly

Juliet Arrighi


reindeer ambition

The last time my mother came to visit, she saw a picture of a deer looking up (very unusual, deer don't usually look up, but this one was reaching for food) in a wildlife magazine, and said that it would be a great idea for a card, to have a deer looking looking up at Santa flying through the sky.  It occurred to me that I had the necessary stamps to do it, but only today did I get around to making it happen.
 The deer doesn't look up on the stamp, either - I just stamped the head, and drew in the neck.  It was surprisingly easy to execute - I spent more time figuring out how to layer it onto a card than I did stamping and inking.  The stamps are a•muse studio.

Challenges:
Amusing Challenges - outdoor scene
Blogger's Challenge - take flight
Stamp n Doodle - wet embossing (the santa sleigh is embossed)
Anything goes - animals
Juliet Arrighi


Baker's twine

It's the latest thing - weaving baker's twine!  I'm sure you've seen it all around lately.  I decided it would look even better on a linen textured cardstock.  The sentiment is from a•muse studio.
This was fun and super easy - I will have to try it again!

Challenges:
Amusing Challenges - baker's twine
Little Miss Muffet - simplicity
Crafts and me - sentiment
Divas by Design - texture
Fab n Funky - no patterned paper


Juliet Arrighi

Olive branch

The dove in the nordic noel stamp set by a•muse studio does not have a branch in its beak, which is fine; most doves don't fly around with branches of any type unless they are building nests.  However, I think that when you are doing a card with a religious message, you really need the olive branch.

The linen texture to the dove is achieved by using a bold image stamp on textured cardstock.  I love how it looks when it is embossed.  I drew in the olive branch with a pencil.  I know, those diecut branches are not olive branches; I think they are marigolds, really, but if I didn't point it out, how many of you would have noticed?

Challenges:


Juliet Arrighi

It's not easy being pine green

My friend Diane sent me some glamorous embossing powders a while back including this one that gives a deeply textured effect.  I love the effect, but after I stamped it, I found that it is a very difficult green to match.  This is as close as I could get with what is in my stash:
Funny how a touch of gold makes anything better.

Challenges:
Amusing Challenges - sketch
Christmas Stampin' All Year Long - photo inspiration
For Fun - must use a rubber stamp
My Mum's Craft Shop - star
Lollypop Crafts - multiple punches (I used 4)


Juliet Arrighi

Santa

I sat down to make a card, and found that my slovenliness was working in my favor - I had the stamp set sitting out from the last card I made, a piece of plaid left that I made a couple of weeks ago, and my copic wallet was hanging on the back of my chair.  Also sitting out were my glue pens and glitter.  Anything is better with glitter!

Challenges:
Amusing Challenges - sketch
Challenge up your Life - Fantasy (unless you believe in Santa, in which case I apologize)
Polka Doodles - song: Santa Claus is coming to Town
ABC Christmas Challenge - Santa Claus
Stampavie - glitter


Juliet Arrighi