Showing posts with label TJ. Show all posts

Layered Goosebumps ATC

I was excited to see the Technique Junkies ATC swap brought back to life by Shelly Schmidt, one of the most talented stampers I've had the pleasure to swap with.  I struggled to pick a technique to start with, until I noticed the Layered Goosebumps technique in the listings.  I had purchased a bottle of Goosebumps spray a while back, but had not had the opportunity to use it.
The mica powder in the goosebumps spray is scanning as grey splotches, but in real life, these are very textured and shimmery.  The apha punches are another thing I don't use as often as I should, but I have to admit that it is often difficult to glue them and place them in a straight line.  I also have to admit that in my basement, that backing cardstock that I also used for the letters looked black.  Sometimes things don't come out the way you plan...

The rose stamps is from a springtime day set from AMuse Studio.  It's one of the few flowers I have that isn't a solid stamp but looks fine just stamped in black.  Sometimes that is all you want.

Challenges:

Juliet Arrighi

Double kissed ATC

DISCLAIMER - my shift key is busted.  If it isn't on the first row or accessible with my capslock, I can't type it.

Kissing techniques - the first one I was forced into.  Too much colorwash spray on one piece of watercolor paper inspired me to 'kiss' it to another piece to spread the ink around a bit.  Once I had kissing on the brain, I had to try kissing my stamps, too.  The solid bird is from nordic noel by AMuse Studio, and the leafy branch which I used both for the kissing and for stamping around the edges is bird on a flowering branch by SweetStamps.

I used a waterbrush to drag the ink on the leaves around, and a tiny bead of embossing frames the image.

Challenges -
Ugh - I need a new keyboard...

Juliet Arrighi

Stitched snowflake ATC

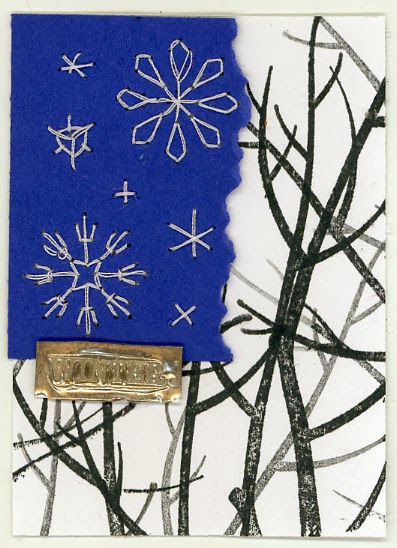
The altereddesigns group challenge this week was to make an ATC with sewing on it. I have a punch that punches holes so that you can easily embroider flowers onto paper.  It occurred to me that it could be used to stitch snowflakes just as easily.
I used the punch for the big ones, and did the smaller ones freehand.  I had a hard time figuring out what I could do to make the the snowflake panel into a complete ATC other than framing it with layers, but then I looked out the window, and saw the trees with their bare branches.  I used the seasonal branch stamp set from AMuse Studio and the depth of field technique to stamp the branches, and then I used the faux embossed metal technique to create a tiny embellishment to tie the two parts together.
Challenges:


Juliet Arrighi

Zentangled flower

This was inspired by a card on Pintrest that a friend forwarded to me.  I don't do Pintrest, but I did like the card, and it inspired me to make this one.
The stamps are all from AMuse Studio, and instead of coloring, I zentangled inside each petal.  If it looks like I cut the flower out and layered it on, that's due to the faux shadow I created with a bit of pencil.  It's a single layer card, no embellishments, no coloring, and still, I am very proud of it.

Challenges:


Juliet Arrighi

Center Step Card

Believe it or not, I started this project with the idea to make a Christmas card with a dancing bear on it.
The stamp is from SweetStamps, and the sentiment is pieced from an old CTMH alpha.  This is the first time I've tried to spell a word vertically with it. The outfit on the woman is paper pieced. My flower did not come out the way I originally intended, either.  I don't know what happened here, but I think it is all right.

Challenges:


Juliet Arrighi

Bargello

I have admired the look of the Bargello technique for a long time, but this is the first time I've tried it.
Finding the paper scraps was the easy part.  Stamping some texture on them was just as easy (I used seasonal branch and marvelous marigolds from A Muse Studio).  Cutting them to size and adhering them in place wasn't really hard, just time-consuming and very fussy.  If you try this technique, I will make two suggestions - first, make sure that the two pieces on which you are gluing your strips are completely coated with adhesive.  I used Aleene's Tack It Over and Over.  Second, use dark or black paper under your strips, so that if there are any gaps, they don't show badly.

The hardest part of this technique is embellishing it - you hate to cover it up!

Challenges:


Juliet Arrighi

Fight like a girl

These cards were so fast, fun, and easy to make, and used up lots of pink scraps.

The top one is a straight herringbone technique, and the second one is a twist on a washi tape card I did recently.  Amuse studio has wonderful printed monochromatic papers, like the chevrons and petit polka dots, but others of the papers used here are simply stamped on white scraps.  The sentiments used are all from the FREE breast Cancer Awareness stamp set sold by amuse studio in October.  In addition to a lot of great sentiments, it has a ribbon stamp that also has a matching die available.  Check it out!

Juliet Arrighi

Santa's Flight Silhouette

The stamp is santa's flight from a•muse studio, and the technique is Scene Silhouette from the Technique Junkies newsletter.  It is easy to turn any stamp into a silhouette,  and with such a dark background (in spots, I was going for an ombre effect), it helps the image stand out.
I created the background by starting with a very pale blue paper, and coloring bands with my water-soluble pastels.  A little swirling with a water brush melted and blended the colors.  the punched edge is a nice contrast.  I added assorted bling to the stars to give them some texture.

Challenges:


Juliet Arrighi

Cloisonne Cat 5

One last cloisonne cat for the week.  This one I heat embossed in Black, then paint with Stargazers.  It's very shimmery in real life.

The background is a technique scrap - like Shelly and Hetty, I subscribe to the Technique Junkies newsletter, and Like Shelly, I have a bunch of backgrounds that I've made that I can't even remember the name of the technique any more.  I recall that it involved reworking scrapbook papers that I didn't like, by painting lightly over them and tearing them into strips.

About the key - I was walking to my crafting desk and saw this key right in the middle of the floor.  It is a shiny new brass key, and it had no key tag on it, so I have no idea what it is for or to whom it belongs.  No one is even home right now except me - the men are off at Boy Scout camp this week - so I have no idea how a strange key found its way onto my basement floor. I don't entertain down there.  If someone wants it, it is on this card now.

Juliet Arrighi

Cloisonne Cat 4 with techniques

I have had fun working on vellum lately, but for this card, I decided it would be fun to try faux vellum.
You may notice that the cat is facing the other way.  That is because the heat embossing is on the back of the paper.  Faux vellum is created by heat embossing your image on regular copy paper and then saturating the paper with mineral oil.  It looks just like the real thing, but is a lot easier to work with, and a lot cheaper, too.

I used my eyelets to attach my faux vellum piece to the background.  You will find that it is just as slippery as real vellum, and glue is worthless.  Notice the corner punch?  it is asymmetrical, which is unusual for a corner punch, and requires special attention to get the corners to mirror each other.  The trick to doing that is to punch two opposite corners with the paper face up, and then the remaining two with the paper face down.

The final technique I would like to point out is the ribbon - I crinkled it with my heat tool.

Challenges:


Juliet Arrighi

Cut Borders

I was at a workshop yesterday to make cards for foster children.  The hostesses of the workshop and most of the attendees were scrapbookers, which I thought was in the same general classification as stampers, but was I wrong!  These ladies were afraid of ink.  All their cards were done with punches and stickers, but not a stamp in the lot.  I brought a couple of stamp sets and a black ink pad and my tombows, and made some cards that looked very different than theirs.  I offered the use of my stamps, but they were having nothing to do with them.

One of the ladies said that she was intrigued by stamping but didn't want to have to by all the stuff, which seemed a funny thing to say, considering there were hundreds of dollars of stickers on the table, and when you use them once, they are gone.  Anyway, I do know that I spend a lot on stamping stuff, but really, I don't need to.  Even a simple stamped card can be satisfying.  Case in point:
This is plain white cardstock, black ink, and some markers and scissor work. The butterfly stamp and sentiment are in the snail&co stamp set from a•muse studio. The Cut Borders Technique uses masking to create a continuous edge of stamping.  The most expensive part of this card is the Technique Junkies newsletter subscription, which is where I learn to do stuff like this.

Challenges:
Juliet Arrighi


Porridge again?

I thought this image from Dover was darling, but I had no idea how to use it on a card until I looked at it with Mother's Day in mind:
On the inside left it says:
Mother Bear felt vindicated when her family saw that someone was willing to break into their home in order to eat the meal they had snubbed earlier that day.
I thought it would be an amusing card for a girlfriend.  I colored the image using the Penciled Twinks technique.

Challenges:

Juliet Arrighi


I woof you

Can you guess what this card is for?
It's a Mother's Day card from a furbaby.

 Dog stamp is by Michael strong, and I used the Banner Card and Watered Crayons techniques from the TJ newsletter. The sentiment is from my computer; I love the handwriting fonts at Fonts for Peas, especially the ones I can color!

Challenges:

Juliet Arrighi


Watered Crayons

It's a new technique at Technique Junkies - Watered Crayons.  I thought I would try it with shades of green.  The problem with making my own backgrounds is that I don't like covering them up with   layers of images and matting; I want them to show.  I decided I would try stamping directly on the background, but since it was such a rich deep color, I went ahead and embossed like crazy.


The grass is stamped with Tim Holtz distress ink and embossed with clear embossing powder; everything else is embossed with white.

TIP:  when you have a lot of heat embossing, especially around a border, do one piece or side at a time to reduce the risk of smudging your embossing media.  Work from the inside to the edges, and let cool between applications.
 All the stamps are from the snail&co set by a•muse studio.

Challenges:

Juliet Arrighi


Bee Cup

The theme for the ATC mingle is "Eek, there's a bug in my house!"  which really stumped me - I don't want to think about bugs in my house.  However, I did remember that I had this old TAC stamp:
Not exactly an "eek" moment, but I like it.  The "wallpaper" is some old Provocraft, the woodgrain paper is from a Tim Holtz stack, and the letters are diecut from Sizzix's Wingo Zingo alpha - possibly the best alpha die ever made. I used the Technique Junkies Layer Up and Penciled Markers techniques - it's not as simple as it looks.  Is that a good thing?

Challenges:

Juliet Arrighi


not Renoir

At the altereddesigns yahoogroup, there is a challenge to make an arch with "Flowers Galore"  the first thing that came to my mind (and probably everyone else's) was to make paper flowers and but them all around a focal point (probably a woman).  I started experimenting with this idea, and everything I came up with just seemed uninspired.  I looked at the few cards that had already been posted, and yes, they were exactly as I supposed they would be.  I felt even less inspired, feeling like I was just making what everyone else was making.

I was looking through my Dover samples hoping for a different direction for this challenge, when I came across a coloring page based on a painting by Renoir (Dover has a lot of coloring books for grownups).  I digitally altered them to fit the project parameters, then printed out several copies with the thought of doing some kind of decoupage, but after I looked at the prints, I realized it would be too fidgety for me to cut out.  I ended up coloring it with the Penciled Twinks technique. The shimmer doesn't show in the scan.
 So, basically, it is just a colored image, which is not what people in the altereddesigns group do.  I suppose I could embellish it, but I'm not convinced it would make it better, just busier. it's a fairly complicated design to color, and my gut is telling me that it looks fine just the way it is.  I just don't know if other people will like it as much as I do.
Juliet Arrighi


Techniques for roses

I have recently come into two different rose silhouette stamps - the wild rose from a•muse studio, and this rose from Sweetstamps.  To be honest, I probably have dozens of roses in my stamp collection.  They are my favorite flower to stamp.  However, these are my first rose silhouettes, and I am excited to be able to use some different techniques with my roses.

This technique is called Copic Colored Embossing.  Some places refer to it as Black Magic, but since Black Magic is now a type of paper (black paper with a colored core, part of the Coredinations line), I'm not calling it that.
It's a very simple card layout.  I tried various embellishments, but ultimately I thought the image was too pretty to cover up.  I can probably sneak a sentiment into the lower left corner if I need one.  The framing element is a Nellie Snellen die.  it is actually a square die, but I cut 2 and pieced them together.

Challenges:

Juliet Arrighi


Bumblefly

When I bought this stamp set last week (10% off this month only, from a•muse studio), I remembered that I had some cute bumblebee brads that would be adorable with the hive image.  Unfortuantely, I didn't dig them out until I had already placed everything; that's when I discovered that they were actually butterflies, not bees.  This is not the first time I've made that mistake with these brads - I remember that they are black and gold, and not so much what insect they are.
I also pulled out my chalks, which rarely see the light of day.  It's an extra step to spray them with fixative, but I do love the soft haze of color that you get with chalks.  I used the Pastel Detailing technique from the Technique Junkies newsletter.

Challenges:

Juliet Arrighi


Banner card

You have probably seen this technique all over the place.  It is currently the sketch challenge over at Blessings Ink, so I had to give it a try:
The banners made me think of international flags.  They are all cut from the SOTF (scraps on the floor, although some people think the S stands for something else).  This technique works with any scraps of any size.  A little sponging of blue distress ink gives it the clouds in the sky look and feel.

Challenges:

Juliet Arrighi


Mono Mosaic

Mono Mosaic is a technique from the Technique Junkies newsletter.  It has very detailed directions for a very specific size and style.  however, since it is never the size I want to make, I end up improvising, and that would be all right if I could cut a square.  I can't cut a square, as anyone in my inchie group will tell you.  I can't cut a straight line, even with my special fiskars paper cutter.  However, I like this technique too much to leave it alone.
This technique also calls for geometric stamps, which I don't have.  I just improvised with what I did have, namely the snail&co set from a•muse studio.  I was able to create 4 different fills to cut into blocks for the technique, which is all I really needed.  This card fulfills the color challenge over at Stamped Blessings, and these other challenges:

Juliet Arrighi