Letter writing 4x4

This is a 4x4 that I made for my altereddesigns yahoogroup.  the theme is letter writing as a background, and it should be no surprise to you that the vast majority of the ladies playing are using fancy script with images of Victorian ladies or the Tim Holtz pen nibs.  I hate making what everyone else is making, so I went a completely different direction:
 The school photos and the math worksheet are printed off the internet.  The notebook paper is actually a cardsock pattern from AMuse Studio.  You may wonder why I would buy cardstock that looks like notebook paper when I have tons of the real thing, but now that I've used some of it, I have to say, it is much easier to work with (real notebook paper is translucent and fragile), it isn't white but a cream color, perfect for a vintage look like this, and it takes media much better than real notebook paper, which was only designed for pen and pencil.the stark white of the math worksheet was too extreme for the rest of the piece, so I used some milled lavender distress ink to tone it down, and I threw in a few hearts (from AMuse Studio all for love stamp set) because, well, it is a love story.

Challenges:


Juliet Arrighi

Crystal heart

This evening I made a little crystal heart necklace from a  pattern I found online:

It came to together fairly easily.  I was feeling too lazy to try to thread two beading needles, so I used tiger tail.  it wasn't bad doing right angle weave with tiger tail, and the ends came out at the perfect spot that I could thread on the lighter pink beads to make it into a necklace.  There was only one problem - running the tiger tail through the beads caused it to curl much like curling ribbon does, and it won't hang straight as a pendant.  I tried running it though straightening pliers, and hanging a weight on it to stretch it (I don't have enough time between now and valentine's day for that to work, even if it would work eventually).  I hate the idea of unstringing all those seed beads to thread it some other way - any suggestions?
Juliet Arrighi

Double kissed ATC

DISCLAIMER - my shift key is busted.  If it isn't on the first row or accessible with my capslock, I can't type it.

Kissing techniques - the first one I was forced into.  Too much colorwash spray on one piece of watercolor paper inspired me to 'kiss' it to another piece to spread the ink around a bit.  Once I had kissing on the brain, I had to try kissing my stamps, too.  The solid bird is from nordic noel by AMuse Studio, and the leafy branch which I used both for the kissing and for stamping around the edges is bird on a flowering branch by SweetStamps.

I used a waterbrush to drag the ink on the leaves around, and a tiny bead of embossing frames the image.

Challenges -
Ugh - I need a new keyboard...

Juliet Arrighi

Stitched snowflake ATC

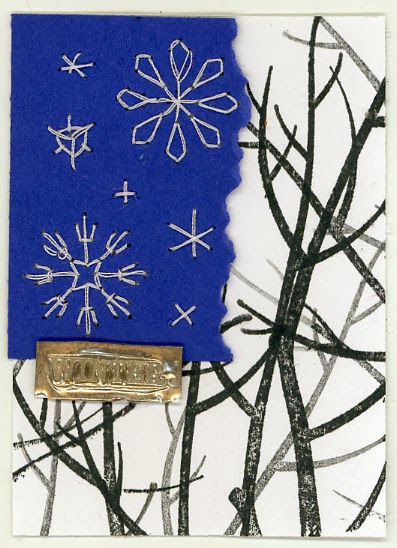
The altereddesigns group challenge this week was to make an ATC with sewing on it. I have a punch that punches holes so that you can easily embroider flowers onto paper.  It occurred to me that it could be used to stitch snowflakes just as easily.
I used the punch for the big ones, and did the smaller ones freehand.  I had a hard time figuring out what I could do to make the the snowflake panel into a complete ATC other than framing it with layers, but then I looked out the window, and saw the trees with their bare branches.  I used the seasonal branch stamp set from AMuse Studio and the depth of field technique to stamp the branches, and then I used the faux embossed metal technique to create a tiny embellishment to tie the two parts together.

Challenges:


Juliet Arrighi

Zentangled flower

This was inspired by a card on Pintrest that a friend forwarded to me.  I don't do Pintrest, but I did like the card, and it inspired me to make this one.
The stamps are all from AMuse Studio, and instead of coloring, I zentangled inside each petal.  If it looks like I cut the flower out and layered it on, that's due to the faux shadow I created with a bit of pencil.  It's a single layer card, no embellishments, no coloring, and still, I am very proud of it.

Challenges:


Juliet Arrighi

Calendar ATC

I'm still here - I just didn't want my Christmas cards to be seen by the people who were going to get them before I mailed them!

My altereddesigns group had a challenge to make an ATC for New Year's, and I really don't have any of the celebratory feelings about the new year that most people do - it's really just the end of the holiday break ,and time to hang a new calendar.  I decided that is what I would do with my ATC:
It is super easy to make a little calendar; I have been using this free program for years.  for the backing, I just used some paper tape in layers, then diecut the numbers from a Tim Holtz alpha die, and the swallow die is from AMuse Studio.  The Tiny Attacher has the perfect size staples for this calendar.  I hope it doesn't get stuffed in an ATC folder - it is too useful for that!

Juliet Arrighi

Cabins in the forest

I had this idea for weeks before I sat down and actually tried it to see if it would work in real life the way it did in my head.  It's simple math, really, but I have been known to forget parts of the equation.  Anyway, I wanted to make a little forest of trees, and then I decided that I wanted a cabin or two in there as well.  I decided to use my ugliest green scrapbook papers for my test run.


Since the tree die is asymmetrical, you need four diecuts for each tree - two cut from the front side of the paper, and two from the back.  Stick them together on the sides, alternating the front cut trees and the back cut ones.  after you get all the sides together, I recommend a dab of glue at the top.  You can get 5 trees out of two sheets of scrapbook paper.

After doing a few trees, I felt that having just a forest was boring, and that I needed a cabin or two. However, I dreaded creating and printing a template.  Suddenly I remembered the Michael Strong mosiac frame had a strong geometry similar to what I needed to cut the bases of the houses, and I realized I could simply stamp the stamp and use that for  template.  I have created this diagram so you can see where the cuts are on the stamp:
 This makes two bases.  The next diagram shows where the folds and the glue have to go:
The roof was cut from another scrap that was 1.75 by 4.5 inches.

So you are probably thinking that I should now be ready to make this with my good paper, and it would be a lovely little scene.  I agree, however, I think it will be a fun craft project when all my kids are home from school - we can all make trees and cabins together.  I know from experience that I can't have my best work waiting as a sample - if mine looks too good, they won't bother to play with me.  Mine has to make them think that theirs will be better.  Therefore, the good trees and cabins won't be ready for a couple of weeks, but you get the general idea of how it goes.

If you would like to try this and you have any questions on how to do it, just ask.
Juliet Arrighi